Sunday, January 30, 2011

Chassis for my SS Desert Racer MK1 project

Pictures below! Scroll down!

Now for another problem to solve. The 1979 edition Tamiya Sand Scorcher used a 2mm green FRP (glass Fibre Reinforced Plastic composite) chassis plate with a 1/16" or so Aluminium lower stiffner plate, now you would think that this combination would be fairly rigid but unfortunately (at least in this particular regard) the chassis is very heavy and flexes alarmingly since there is no second chassis plate on a double deck to tie the front and rear chassis sections together and when you pick the car up you can feel it bow in the middle horridly. The same happens with the new SS2010 edition, as the plate is still only 2mm FRP but now it's a black color. It's not carbon fibre.

So when you do even small jumps with the car using the original very brittle Sand Scorcher 1979 edition PolyStyrene bodyshell the body often quickly gets stress cracks around the body mount hole at the front and around the 2 holes on the rear of the roof section that hold the bodyclip on. The newer Blitzer Beetle shell that I am using is softer and more flexible and thus less prone to cracking but still it's a big problem.

Hence I needed to find a rigid chassis to use. There are several solutions to this problem. One involves using two original FRP chassis plates, but as you might imagine this does not eliminate the issue of chassis flex. There are some 2mm Carbon Fibre chassis plates available from sellers on Ebay but they still suprisingly have NOT got the rigidity that is really needed. I suppose you could use two of these but then the chassis is a black color and I am not much keen on that. Also carbon fibre plates look awful when they have wear on them. Maybe I will try this idea later on though as an experiment.

A TamiyaClub.com (TC) member called Cherrybomb used to make an Aluminium chassis based on the SS1979 (MK1 parts not MK2 so I read) but this is no longer available and in any case I suspect that it would not fit my SS2010 gearbox and other parts etc. TC member TWINSET made an Aluminium chassis way back in 2005 that a lot of TC members bought and it was from HE30 or equivalent grade alloy and was 3mm thick and had side pods for R/C equipment like receiver and Electronic Speed Control (ESC). Unfortunately his drawings for it were in electronic form on the PC in the office at his old job so he no longer has access to them. Also he stropped making them around at least March 2006 so I read.

There is a TC member called Helge which makes a nice chassis in Aluminium but it's 35 Euros which I personally feel is too expensive to justify on this project. Finally there is an Ebay member that sells a 2mm thick chassis with side pods but 2mm Aluminium is too thin, I personally feel.

Hence I have decided to have a go at making my own chassis. I ordered an off cut off Ebay of grade 6082 Aluminium (high strength alloy used for general use in the construction industry) of 540mm x 148mm x 3mm thick from Ebay seller ukroy. Cost was 6 GBP and about the same for postage to NW England where I live. I inspected it when it came and it has some deep gouges for about 2 inches close to the end of the sheet. The original FRP chassis was 235mm long approx., so I was hoping that 540mm would give me 2 chassis' (470mm plus a couple of mm for the blade width when it removes material in the middle) but I wasn't banking on those gouges, but by the looks of it I should still get 2 chassis' out of it. It was quite flat material but not perfectly so, and had the usual guilotene line all the way along one side of the sheet for about 1.5mm or so width, and a bevelled edge there, but that won't be a problem since the chassis pods taper from this max. width inwards towards the front end of the Beetle body anyway.

Here's a pic' of the newly arrived sheet below. Not that exciting to look at yet LOL.

3mm chassis raw material just arrived. Shown next to original SS1979 FRP chassis plate for scale.
Fortunately I chose to get an offcut rather than a full sheet as it's a lot less expensive on material and postages, and it is already just about the correct width.
Annoying deep gouges near one end. Dissappointing. Fortunately there is enough material to cut out 2 chassis' and still be able to cut off this section with the gouges. Good job I ordered such a long chassis plate!

Abrasion test with P800 Silicon Carbide used dry to see if I could get out some of the smaller marks and what finish I would then have. I can use a finer or coarser grade later on to decide on which finish I like best.

I don't think I'll bother to have this chassis anodised. Or in any case I will look into it later when I've finished the chassis. Or maybe I'll clear coat it with something. I want to at least try and avoid it getting corroded when I run it through the sea water at the beach on the west coast of NW England at Southport or Ainsdale.
 Cheers,

Alistair G.

Saturday, January 29, 2011

Decals for my 'Scorcher Desert Racer MK1 project

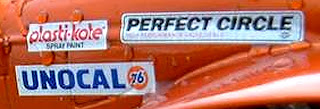
I was wondering where to get the "PERFECT CIRCLE" and UNOCAL decals from, like Joe (TamiyaClub member Volksrod) the very skilled modeller used on his orange Scorcher here? I asked Joe but he couldn't remember where those ones came from. I really liked the look of these particular decals. If anyone knows, please tell me!

Here's a pic' of them on Joe's bug (enlarged) ;-


I looked up what the decals meant and some of you probably already know, but Perfect Circle were largest makers of piston rings in the world but are now part of Mahle Clevite Inc, and Unocal was the Union Oil Company of California and 76 was the Octane rating of the fuel in 1932 so I read! Pumps in the USA have Octane ratings from 87 to 91as a general rule apparently, so their fuel has less horse power than ours in the UK which is either 95 (normal, Premium) or 98 / 99 (Super / Tesco Momentum).

Joe said that most of his decals on his orange SS were from a Parma Stock Car Sponsor decal sheet.

I had a look around and found the following sponsor decal sheets in 1/10 scale for RC cars ;-

http://cgi.ebay.co.uk/SPONSOR-DECALS-1-10-BODY-SHELL-TAMIYA-YOKOMO-HPI-PARMA-/260720692529?pt=Radio_Control_Parts_Accessories&hash=item3cb42a0d31
...this latter one is from Ebay seller topsecret0304 and is unbranded!!

I bought the Traxxas #2514, and Parma #10601 Medium Off Road and #10788 Stock Car decals but none of them have PERFECT CIRCLE or UNOCAL decals on them like on Volksrod's bug!


Help!

EDIT: 30/01/2011 I just remembered that Ebay member screenprintdigital does some 1/10 sponsor decals, and that there was once a company in California called AUTOGRAPHICS that used to do a large selection of RC sized sponsor decals, details here. Even searching Ebay with "1/10 decals" brings in some good stuff with not too much to go through. Still can't find my beloved 2 decals shown above though 8-(

However I have found the original 1:1 PERFECT CIRCLE decal listed here and shown as a large GIF here so at least I can print one out myself on white vinyl for inkjet printers (which can't print white!), plus there is a slightly different one shown here. I have added the bitmaps below. The first one was cut off slightly on the right on the above web page ;-


Comparing this with Joe's bug, I now see that he has used the latter "High Performance Valve Seals" variant of the PC logo. The "Performance Piston rings" variant is 13" (330.2mm) x 2" (50.8mm) in 1:1, so in 1/10 scale form is 33.0mm x 5.1mm. The size of the "High Performance Valve Seals" variant PC logo is not listed on the website in the link above so I've just e-mailed them to ask and I'll put the info. in here when I get a reply.

Also I just found the original 1:1 UNOCAL 76 decal here and again it was cut off very slightly on the right on the above web page, and again here is the bitmap for convenience ;-

This Unocal 76 logo is 12 3/4" (323.85mm) x 2 1/2" (63.5mm) in 1:1 which scales to 32.4mm x 6.4mm in 1/10 scale that my R/C Beetle is. So now I know what size to print them out at. I'll be using my newer Dye based ink Canon MP610 printer rather than an older printer with pigment based ink as the newer printers like my Canon have waterproof ink (the ink used to run on my old Epson Stylus Photo 750).

Whilst I am at it, here is a list of all the other 1/10 scale old sponsor decals that I found ;-

http://www.mcallisterracing.com/racing/page13.html
...they make #508 Fender Sponsor 1/10 Detail decals


http://www.rctech.net/forum/r-c-items-sale-trade/202227-slixx-decals-oval-1-10-scale.html
...this shows quite a lot of pictures of the Slixx brand 1/10 scale sponsor decals. Slixx went out of business so I was told since the sponsors wanted too much money to keep it viable. Same thing happened to a few others. What a shame and a joke. There was a time when it was seen as free advertising and brand reinforcement on young minds and 1/10 R/C kits came with REAL sponsor decals. Then they started demanding license fees the idiots. They should be paying US for putting real sponsor decals on our RC cars IMHO.

http://www.rccarstickers.com/#/nascar1/4546703609
...this is ScreenPrintDigital, the Ebay seller of the same name mentioned above


Cheers,

Alistair G.

Sand Scorcher Desert Racer MK1 - more progress - part 2

Right, I started cracking on with my SS project shown here http://www.tamiyaclub.com/forum/index.php?showtopic=45205, and here Part One. I started on the second wing (fender) on the other side of the Beetle (Bug) body, and finished drilling the holes and attaching it.

Pic's! ;-


Using Sand Scorcher (1979 edition) input gear in gearbox / gearcase. Ballraces for more durability (wear resistance) than the standard Phosphor Bronze "Oil-less" bearing bushes that SS1979 uses as standard. Not going for rubber shielded ball races because the rubber shield ain't gonna keep the salt (sea) water out when I run on a beach near the water... The gear is Brass. 

Buggy Champ 2009 / Sand Scorcher 2010 / "SRB MK3" gearbox being used since I didn't want to subject an original SS1979 gearcase to salt water corrosion when running on the beach and through the water near the shore! The surface of the casting is more shiny than the original SS1979 gearcases, which were "satin". The MK3 gearcase has a slightly "dirty" appearance though when seen in the flesh, even when new like this one here, because of a mottled appearance of the surface. There were some "bad" casting marks on it as well which were a tad dissappointing. The mould is very crisp compared to the MK2 and MK1 and I think it's been computer (CAD) designed. They must have "lost" the original moulds...

I am using a Team CRP Idler gear in brass to replace the original one which looks to be Nylon-66 and the original is known to deform with heat under prolonged use with powerful motors so I am told.

I decided to replace the stock kit plastic solid main final drive gear (which is not a differential) with a limited slip differential (a Thorp brand Ball diff' in this case) so that if one wheel slips in the sand, the other should provided at least some grip. The diff' tightness is adjustable via an allen head bolt through the hole you see in the half shaft which is sticking up in this picture. Unfortunately my old Thorp was bought second hand and is fairly "shagged out" and is noticeably rough in it's action (much more so than my "Jakes" ball diff' that is also very difficult to get) and maybe I'll end up using a Tamiya ball diff' that they made especially for the SS2010 edition.

These are the "Tin Snips" for cutting the 0.7mm thick Aluminium alloy sheet that the home made wings are made from.


Holes drilled for clip assembly so that the body can be mounted onto the roll bar. The SS1979 and SS2010 bodies have these holes, the Blitzer Beetle (BB) shell used here has only the "stubs" of the holes on the underside of the shell showing, where the holes used to be in the SS1979 body when they modified the mould for the BB. So I drilled them out with a 1.5mm drill bit held in a Swivel Head Pin Vice, and then opened the holes out with a 2mm drill bit. I had to recenter the left 1.5mm hole (when seen from the inside of the shell) slightly with a needle / rat tail file, before making it 2mm, as it has to be in the right place and I seem to have a knack for letting my drills wander...  also note that the screws are going to point inwards (so that they get closer to each other towards the end of the screws) since the top of the body is rounded on the roof and it forces the screws inwards, whereas the bodyclip wants parallel screws. This creates stress on the screw holes and leads to cracks in the shells. To avoid this I made one screw a looser fit in it's hole than the other. Also I think I will be reinforcing the area around these holes with 1 or 1.5 or 2mm PolyStyrene sheet to prevent further stress fractures when the body is clipped and unclipped from the chassis roll bar and when the car is jumped and the body shakes around (or when you land on the roof!). Which reminds me, I plan to be adding a functional roll bar internally to protect the body from severe cracks if it rolls.


Thorp ball diff. Worn! But works! Or so the seller told me when I bought it several years ago! Well I can tell it works when rotating each half, but it's got a sort of rough action. This is because the Thrust Washer and 1/16 balls are worn. The thrust washer has already been turned over once and is actually starting to disintegrate. I could use a new one. But then again the SS2010 optional ball diff. is cheap at 18 GBP on Ebay...

Cheers,

Alistair G.

Tamiya Sand Scorcher Desert Racer MK1

In this TamiyaClub.com topic http://www.tamiyaclub.com/forum/index.php?showtopic=45205 , I have started to construct a new model based on a Sand Scorcher but with Aluminium wings (fenders) and other custom things. I had been adding new information and pictures there but alas due to new rules introduced on TC you can't reply to your own topic to add new information and new pic's. So I am starting my own blog here to help others who would like to have a go at doing the same thing.

EDIT: well I'll be darned, after I complained the moderators saw the light and changed the rules and now I can add more to my posts on TC! 

This Radio Controlled Vehicle is based on the famous Sand Scorcher model in 1:10 scale from the Japanese brand Tamiya with electric motor power and working suspension http://tamiyaclub.com/car.asp?id=16. I am using a Tamiya Blitzer Beetle bodyshell as at the time I started it they were plentiful in supply and it saved hacking up a lovely old model.


 Next to come will be pic's and text showing where I am up to so far and what I plan to do.

Cheers,

Alistair G.